 4.8 out of 5 stars! See what our customers are saying on


Overview
When migrating from an Android device to a de-googled privacy phone, you'll probably want to transfer your contacts, photos, and other personal data. The most secure way to do this is manually by connecting both phones to a personal computer, or by copying data to a flash drive.
CAUTION: It may be tempting to install a third-party app that claims to do it with a few clicks. Avoid this at all costs because you'll likely have to sign-up, give personal information, pay for their "services", or worst of all, your data may be harvested to their servers. Instead transfer your personal data securely at no cost by doing it yourself.
Table of Contents
- Transferring Contacts
- STEP 1: Export contacts from the Contacts app
- STEP 2: Move vCard file off of the old device
- STEP 3: Transfer vCard file to the new device
- Transferring Photos
- METHOD 1: Transfer photos using a personal computer
- METHOD 2: Transfer photos using a USB flash drive
- Transferring Bookmarks
- Transferring Calendar and Tasks
- App-specific Data
Transferring Contacts
This process describes how to export your contacts to a vCard format and move them to the new device using a USB flash drive or via your computer.
NOTE: The vCard formatted file has a .vcf extension and is equivalent to an address book containing business cards.
STEP 1: Export contacts from the Contacts app
The first step is to export contacts from the contacts app on your old device.
- Open Contacts app on your old device
- Tap menu in the upper left corner
- Select Settings > Export > Export to .vcf file
- Name the file and select SAVE
The .vcf vCard file is now saved to your device's Downloads folder.
STEP 2: Move vCard file off of the old device
Choose one of the three methods below to accomplish this task.
Method A: Use a USB flash drive
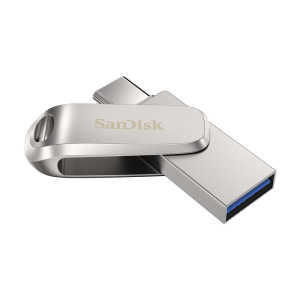
TIP: A USB flash drive is a reliable and easy method to migrate data. We recommend this USB flash drive as an accessory when purchasing your new de-googled device.
- Power on the old device and insert a USB flash drive into the USB Type-C charging port
- On the phone, pull down notifications from the top of the display
- A new notification will appear named Settings > USB drive; For storing photos, videos, music and more (if you do not see this notification, remove the flash drive from your device, reconnect it and try again)
- Tap Explore below the notification message; the Files app opens displaying the USB drive contents
- Tap menu in the top left corner
- Tap Downloads to view the folder contents
- Scroll through the contents and find the .vcf file you recently exported
- Hold a finger on the file name until it becomes highlighted
- Tap the three vertical dots in the top right corner
- Select Move to...
- Again, tap menu in the top left corner and select USB drive
- Tap the MOVE button at the bottom of the screen; the .vcf vCard file is moved to the USB flash drive
- To eject the USB flash drive, pull down notifications from the top of the display and tap Eject under the USB drive notification
- Pull the USB flash drive out of the device's charging port
Method B: Send yourself an email
If you have email set up on the old device, create a new email and attach the .vcf file to the email. Send the email to yourself. Then on your computer, open the email and save the attachment to your computer's hard drive.
Method C: Connect old device directly to a computer using a USB cable
In this method, we will connect the old device directly to a computer using a USB charging cable.
WARNING: Not all charging cables are capable of transferring data. If you cannot establish a connection, try a different USB cable
NOTE: If using a Windows PC and you experience problems establishing a connection to the old device, follow this tutorial.
- Power on the old device and connect directly to computer using a USB cable
- On the phone, pull down notifications from the top of the display
- Tap Charging this device via USB notification (if you do not see this notification, remove the cable from your phone, reconnect it and try step 2 again)
- Tap again on the Tap for more options message
- A menu named Settings > USB Preferences opens. Select File Transfer
- The device should now be recognized by the computer
- From the PC's File Manager or from Apple's Finder, click the device's file system called Internal shared storage
- Copy the .vcf vCard file from the Download folder of your old device to a location on your computer's hard drive
STEP 3: Transfer vCard file to the new device
Now that the vCard file is on your computer or USB flash drive, choose one of the two methods below to import it to your new device.
Method A: From USB flash drive
- Power on the new device and insert the USB flash drive into the charging port
- Open Contacts app
- Tap menu
- Select Settings > Import
- The Files app opens; tap menu in the top left
- Tap USB drive and scroll until you see the vCard file
- Tap the vCard filename; your contacts will be imported to the Contacts app
- To eject the USB flash drive, pull down notifications from the top of the display and tap Eject under the USB drive notification
- Remove the USB flash drive from the device's charging port
Method B: From computer with USB cable
- Power on the new device and connect directly to a computer using a USB cable
- On the device, pull down notifications from the top of the display
- Tap the notification Charging this device via USB (if you do not see this notification, remove the cable from your phone, reconnect it and try step 2 again)
- Tap again on the Tap for more options message
- A menu named Settings > USB Preferences opens. Select File Transfer (the device should now be recognized by the computer)
- On your PC's File Explorer (or Mac Finder) application, look for and click on the device name in the left menu of devices (i.e. Pixel 8a)
- Double click the device's file system folder called Internal shared storage
- Locate the Downloads folder in the list of folders
- Copy the vCard file from your computer into the new device's Downloads folder
- On the new device, open the Contacts app
- Tap menu
- Select Settings > Import
- Select the vCard file from the Downloads folder
CONGRATULATIONS: Your contacts are now imported into your new phone's Contacts app
Transferring Photos
METHOD 1: Transfer photos using a personal computer
This process involves connecting your old device to a computer using a USB cable similar to the steps above for contacts, followed by connecting the new device to the same computer and copying the photos over. The steps below are for a Windows computer, but will be similar if you are using Linux or Mac.
Step 1: Transfer photos from old device to PC
- Connect the old device to your PC with a USB cable
- Turn the phone on and unlock it
- If asked, to trust the computer in use, select Trust
- On your PC, click on the Start Windows button
- Open the Photos app
- Select Import, then select From a connected device
- Follow the instructions and choose which photos and where you want to import
NOTE: If using a Windows PC and you experience problems establishing a connection to the old device, follow this tutorial.
Step 2: Import photos to new phone
- Connect the new device to your PC
- Go to the folder where you saved the photos; Select the photos, right-click and select Copy
- Go to This PC, find the icon representing your phone and click the device's filesystem called Internal shared storage
- Open the folders DCIM > Camera
- Right-click and select Paste
METHOD 2: Transfer photos using a USB flash drive
TIP: A USB flash drive is a reliable and easy method to migrate data. We recommend this USB flash drive as an accessory when purchasing your new de-googled device.
Step 1: Copy photos to a USB flash drive
- Power on the old device and insert a USB flash drive into the USB Type-C charging port
- On the phone, pull down notifications from the top of the display
- A new notification will appear named Settings > USB drive; For storing photos, videos, music and more
- Tap Explore below the notification message; the Files app opens displaying the USB drive contents
- Tap the menu in the top left corner
- Tap Images to view the folder contents
- Scroll through the contents and hold a finger on a folder or image filename until it becomes highlighted
- Tap the three vertical dots in the top right corner
- Select Copy to...
- Again, tap the menu in the top left corner and select USB drive
- Tap the COPY button at the bottom of the screen; the image files and/or folders are copied to the USB flash drive
- To eject the USB flash drive, pull down notifications from the top of the display and tap Eject under the USB drive notification
- Pull the USB flash drive out of the device's charging port
Step 2: Import photos to new phone
- Power on the new device and insert the USB flash drive that contains your files into the charging port
- On the phone, pull down notifications from the top of the display
- A new notification will appear named Settings > USB drive; For storing photos, videos, music and more
- Tap Explore below the notification message; the Files app opens displaying the USB drive contents
- Scroll until you see the folders or image files; hold a finger on each one until they become highlighted
- Tap the three vertical dots in the top right corner
- Select Copy to...
- Tap the menu in the top left corner
- Tap Images to view the folder contents
- Tap the COPY button at the bottom of the screen; the image files and/or folders are copied to the Images folder
- To eject the USB flash drive, pull down notifications from the top of the display and tap Eject under the USB drive notification
- Pull the USB flash drive out of the device's charging port
Transferring Bookmarks
If you use Firefox to sync bookmarks, simply download the Fennec app from F-Droid and sign into your Firefox account on your new phone. The other method is to export bookmarks from your internet browser via an .html file from the Android device, then import the file to your new phone, similar to the process above for contacts. Since there are many browsers, the process may vary significantly.
Transferring Calendars and Tasks
If you only have a few entries in your Android device calendar or tasks, it's best to manually recreate them in the new phone's calendar. However, if you depend on the calendar and have extensive entries, there is no easy way to sync calendar events between phones. There are many guides online that tell you to sync using Google Calendar. But since privacy phones do not contain any Google apps, that method isn't an option. Alternatively, DAVx5 is an open-source app that syncs using CalDAV/CardDAV service to your choice of cloud storage (we recommend Nextcloud or OwnCloud).
App-specific Data
Some personal data on your Android device is likely app-specific. Therefore, you'll need to refer to the app's documentation or help files to figure out how to migrate data.
Need Assistance?
If you purchased a privacy phone from us and still need help migrating your personal data, contact us for assistance and we'll be glad to help.